Sunday, March 4, 2018

Round 6- The Magic Of Alice by Deb Stephens


The Magic Of Alice- Journal Entry 1.
Hi Everyone!
It has been a while but I am so glad to be back in this round and swapping Art Journals with a talented lot of artists. I'm hoping this will re-inspire me to get journaling again.
Anyway, the Journal itself was made from a second hand, hard bound book I purchased from an OP Shop. One of my very clever crafty friends re-purposes these into Scrapbook Albums all the time and gave me a lesson on how to do it for this swap (eternally grateful for your patience and for sharing this skill with me, Raiyana.) I used a range of paper from Graphic 45 called Halloween in Wonderland which is just gorgeous! I have left my front cover very basic at this stage as I have a collection of charms and lots of 3D embellishments I want to use on it but I fear that it will not withstand the rigors of postage around the country for a year so I will finish this when it comes home to me and show you in my final Blog entry.
The pages are for our entries are a  Mixed Media heavy card stock. Initially when I joined I thought we were going to have a group of about 7 people in each round so I created single pages. When numbers got finalised and the requirements stated each participant had to do a double page spread I panicked! i though I would have to re make my journal and add more pages until another friend suggested adhering extensions to the existing pages so that is what I ended up doing, so each page folds open from the spine. Artists in this round will journal on one side of each fold out page. 
For my entry I started by drawing a mask in the shape of a keyhole. I used Distress Oxides to apply colour to the background. I them used die-cuts in black card stock and adhered it to look like silhouettes. I then penciled in the outline of Alice and used Neo Colour crayons and a water brush pen to apply colour. Now I am the first to admit I am not great at drawing facial features, so I used Jane Davenports' set of facial features stamps and stamped in her eyes, nose and mouth. I then added the tree die cut behind her head. After covering it all with gel medium and letting it dry, I added highlights with Fabercastell Pitt Pens and smudged. I may or may not add a quote at a later date, I will just see how I feel when I get her back.
Hope you all enjoy the journal and I look forward to seeing all you Alice inspired entries.

Initial Prep. Removing the pages.   


The Front Cover. Graphic45 Paper Halloween In Wonderland.  
Envelope containing my signed contract.


Postage order and my guidelines for entries in this Journal.


Thursday, March 1, 2018

AAJS Round 6 : Sharon's Vintage Circus Journal!

Today I am sharing my journal process and pics for Round 6!!
 
 
LOVED creating this "Vintage Circus" ring bound journal - sending off to Colleen today!!


I started out printing some digital papers by Gecko Galz "Life is a Circus" set - just perfect for my theme! I adhered them to my precut pieces of card to make the front and back covers (2 pieces of card for the front and back which you will see I sewed together later on).
 
 
After I adhered the patterned paper to the base card and trimmed the overhang I added some gesso and strips of old book pages - before the gesso was completely dry I "tore off" the book pages to leave some of the text behind. I wanted to make my background pages look vintage and worn!

 
I added some texture paste through a few stencils and allowed to dry.

 
Next I used a few ink sprays on the pages to highlight the texture paste - love the effect I am getting with the layering!
 
 
Then to add a bit more colour and depth I used some water soluble crayons and water spritzer to smudge the colour around!

 
Then I used my sewing machine to sew the two pieces of card together - so I eneded up with a front and back cover which are both double thickness for added strength.

 
Now some fun printing and fussy cutting the collage images - and what fabulous images for my theme - from my fav Etsy store of course "Art Tea Life"
 
 
Front cover:

 
Inside Front cover:

 
Inside Back cover:

 
Back cover:

 
Then to make the pages for everyone to decorate!! I added some printed card to the edge of each page for added reinforcement for the curtain ring biniding. Each piece is A4 folded in half so they can be opened out and decorated! Option is also there to decorate both sides if anyone is keen LOL!
 
 
Contract printed on matching paper along with a little note from me to the participants!
 
 
Lined everything up and punched the holes for the curtain rings.
 
 
Showing an opened out page - also thought if it gets too bulky for posting near the end the pages can be opened out to make it flatter and easier to pop in the letterbox!

 
Hope everyone enjoys creating in my journal - I can't wait to see what everyone creates!
 
Sharon


Tuesday, February 27, 2018

Walk like an Egyptian

my journal is finished and ready to go

I had a few issues getting the rest of the photos on the blog...it dose not like my iPad ah well you will just have to wait until you get it ....a surprise is good


Saturday, February 24, 2018

Invitation to Dreams Fantasys

This is very new to me I haven't blogged before Thank You Louise for talking me through it . As a little girl I always wanted to be a princess and wear beautiful dresses I never got my dream so my first page witch I will try and add later, I made my dream come true I cant wait to start I love so much learning from you very talented ladies Thank you Hugs Robyn xx

Friday, February 23, 2018

Round 6. Words of Wisdom. by Pam.

Finally finished my art journal.It was a hard slog but I got there in time. I started with my sheets of stonehenge paper which I tore into quarters and then folded in half to give me a journal approx A4 size. It has two signatures and a cover that wraps around.

I painted some colours over the cover and then stencilled over with white paint.


I then added some black paint through a stencil.


I chose to use the middle spread because there was a gap between my signatures. I painted, reverse stencilled, stencilled and stamped and generally made a messy background with colours that pleased me.


I stencilled my yoga pose with black paint and then stencilled over with white, cut her out and stuck her down.


Opposite page is my quote which reads: If you only have one smile in you, give it to the people you love. 
 Maya Angelou.


This is how the whole spread looks.


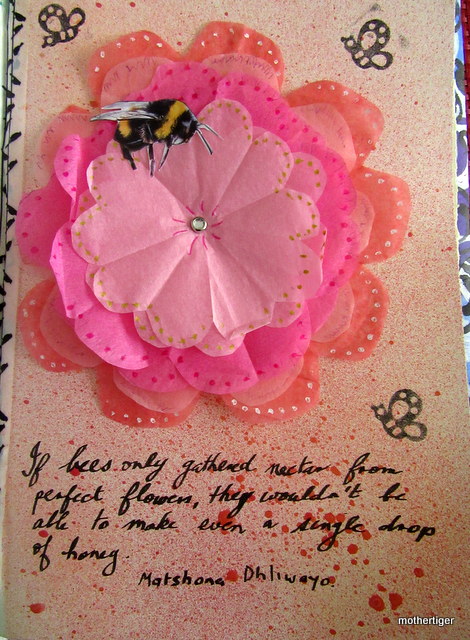
On the page next to the inside cover where my contract is attached, I made a flower from tissue paper on a sprayed background with a lovely quote: If the bees only collected nectar from perfect flowers, they wouldn't be able to make even a smallest drop of honey.
 Matshona Dhliwayo.


 And next a title for my cover.


At the back of my journal I have included a series of speech bubbles for my guests to say a few words if they choose to about their spread and when they worked in my art journal.


And lastly could I please remind everybody to clearly sign and date their work.

Janie O'Brien's round 6 - Exotic Journal

The first thing I do is spend hours on the internet searching for images that please me and are suitable for my theme "Exotic." I end up with many, many images and finally make a selection of the ones I'll print. I may print as many as 10-20 pages pages, then fussy cut out each individual element. By the time I have completed this I have also created by background below. In this case using gold paint, Japanese stencil with touches of black metallic spray. I then play with the individual collage elements until I have selected those that please me together and will use in my composition.
Background
My finished piece, with all selected elements glued down

This is the second page I created for my theme, Exotic, created in similar fashion to page one. Does anyone recognise the b&w shot of the handsome gent in the middle. It's Rudolph Valentio, the heartthrob of pre-talkie movies 1895-1926.


Monday, February 19, 2018

AASG ROUND 6 JOURNAL BY COLLEEN


My theme for this round is
PAPER NAPKIN ART.

I made my journal cover with 2 manilla folders joined, so I could have a large cover flap. I covered the outside with a gorgeous green floral print napkin, & the inside with a napkin covered in birds. I edged it all with a black patterned washi tape, which I machine stitched on. I made a large pocket for the front, & a diagonal pocket for the back flap with a pretty floral print. They were both machine stitched on as well. The front has a large decorative floral piece on top & the back, has a smaller floral piece on it. Before I added the pages I covered the whole thing with a liberal coating of PVA, so it sort of has a vinyl look & feel. It has 4 signatures of 300gsm mixed media paper.


For my Title page I put a coat of titan buff on it, then covered it with one of the spare layers of napkin to give some texture, then I tore pieces of blue napkin & floral bits, & added them from the top down. I cut the title out on my cricut in black card & glued over the picture, lastly I outlined some of the images with a black paint pen & edged the page with black paint.


For my main page I once again painted a base of titan buff. I layered flowers, butterflys & birds, as well as a border.


I sponged blue distress ink in the bare areas at the top, & proceeded to add more elements. The distress ink just smudged wherever I put glue, so I just mucked it all up to look like a cloudy sky. More butterflys & leaves & torn up text. 


I outlined again with a black pen & edged with black paint. I wondered whether to do any stamping, but decided to leave it as it is.


For the inside back page I had this cool shirt napkin I wanted to use. I made a geometric quilted look background & covered with the shirt & a few floral images.


I made all of this with just manilla folders, glue, napkins, black paint & a few paint pens. Plus some washi tape & machine stitching & the thread used to add the pages. So happy with it.